

Free Shipping over $100*
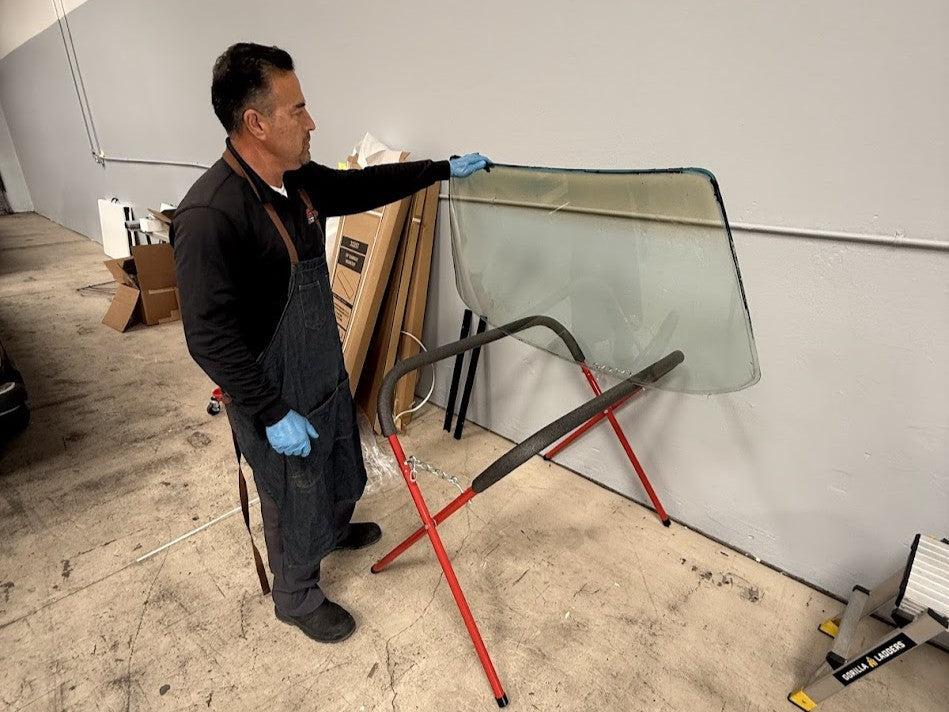
The windshield and rear window were safely removed and set aside in a safe location to wait for me to clean up the tracks in preparation for reinstallation. Cleaning up the window tracks will be the most time-consuming task of the entire project. The rust damage was extensive, which is due, as Jesse from Auto Glass Specialists explained, to the poor design used in those days. The design essentially guaranteed the collection of water and moisture underneath the seals.
The goal of cleaning and repainting the glass tracks was to create a clean, like-new surface into which the glass could be re-set. On the other hand, I did not want to have to repaint the entire roof. So, I had to plan out where I would end up blending in the new paint on the roof and sail panels. Then, carefully plotting work backwards from the final coat of paint, I had to plan out the coverage area of each step to determine how far out into the intact paint will the impact of each step would extend.
The tracking refurbishing project is a long, tedious process that takes time and patience, including some mandatory curing times. It ends up being about 16 separate steps, if I’ve counted correctly! So, it makes sense to organize the remainder of this blog by describing each one of those steps.
1. Vacuum Up Loose Particles There was a lot of “rust dust”, tiny particles of rusted metal, and other debris that I vacuumed out of the tracks with just the end of the vacuum hose.
2. Scrub the Loose Stuff and Re-vacuum I used a stainless-steel wool pot scrubber to scrub the tracks to take away some of the loose crusty rust that didn’t vacuum up. This helps to reduce the amount of flying material during the grinding step. When re-vacuuming, I used a “duster brush” which is circular and has hogs hair bristles, which helps brush any particles that are sticking to the surface so that they get sucked up.


3. Grind Away Loose Rust One of the keys to reducing the possibility of rust coming back is to remove as much of the rust as possible. That’s why a body shop performing a high-end restoration will often resort to cutting out the rusted area completely and welding in new material. That type of treatment was well beyond the scope of this project, however.
So, I picked up a pre-packaged grinding wheel assortment from the local big box store. Before firing up the cordless driver, I masked off the intact paint next to the spots to be ground, just in case the rotating grinding wheels decided to go on a path of their own. Holding the cordless carefully, I slowly made my way around the rusted spots, trying to grind off as much of the rust as possible.
And, you guessed it, another treatment with the duster brush attachment.
4. Clean and Degrease To make sure the rust converter, primers, and paint adhere correctly to the surface, I used RUPES Reveal Strong surface cleaner with a disposable blue shop towels. Reveal Strong is a very powerful product that can effectively remove even the most durable adhesives from the paint. It was also great for removing leftover silicone sealant residue from the glass tracks.

But I did notice that some of the paint color was rubbing off onto the towel while wiping with Reveal Strong. Fortunately, the areas that I was cleaning were going to be repainted anyway, so it was no matter. But this reinforces the importance of being careful when using Reveal Strong on old paint and brand-new paint. Always do a test spot on an inconspicuous part of the panel that you need to clean.
5. Sand and Re-clean The next step was to sand the area for two reasons. First, sanding with 220-grit paper by hand, I wanted to smooth out the ground parts a bit, and to blend the edges of the grinding into the existing paint. Second, using 600-grit sandpaper by hand, I roughed-up the surrounding areas that would eventually receive new paint.
After sanding, a quick duster-brush vacuuming and light wiping of the area with RUPES Reveal Strong.
6. Apply Rust Converter A rust converting liquid contains chemicals that react with the remaining rusted surface, creating a more stable chemical coating that helps prevent further oxidation of the bare metal. It also acts as a moisture barrier, which helps prevent future rust from forming. Moreover, the resulting black layer is ready for priming.
I used an artist’s brush from a local craft supply store to apply the rust converter. The manufacturer allowing the first coat to dry 30 minutes before applying a second thin coat. Once the application of rust converter was completed, the area has to be allowed to cure and dry for 24 hours.
7. Buff Neighboring Intact Paint On the roof, my plan was to use as a paint blending target, the existing body lines that run parallel and only inches from the tracks. The roof paint was moderately oxidized. To make sure that the clearcoat blend did not cover oxidized paint, I would need to buff the paint back to shiny, more original looking color right up to the edge of the work area.
Using the RUPES system I utilized a Ibrid 15 polisher, blue wool pad, and D-A Coarse to shine up oxidized paint in an eight-inch strip that included the blend area.
8. Sand and Clean I performed one final hand sanding with 1000 grit sandpaper, followed by a wipe with Reveal Strong. This prepared the blend area to receive paint. In this step, it is important to remove the gloss from the paint in the blend area. It will return later after the blending solvent is applied and the area later buffed to shiny. This sanding and cleaning step also removed the high spots of dried rust converter.
(Note: although there were pits in the tracks where the rust had been removed, these did not have to be filled and sanded because the window gaskets would completely cover any pits.)
9. Masking for Priming The tracks would next need to be primed to create a smoother, more even surface that contributes to the adherence of the sprayed-on color basecoat paint layer. But I didn’t want to get primer overspray on the exposed interior surfaces. Nor did I want enormous swaths of exterior surfaces to be coated in primer overspray.
The best result of the priming step would be to have the primer edge only millimeters from the spots that needed priming, which include any bare metal and converted rust spots. I also had to consider how far the color coat would extend out into intact paint, with the aim to preserve a strip of non-color coated original paint near the blend area target. By doing this, the clearcoat would fully cover the colored strip, leaving room on the original paint for a clear blend area absent underlying color coat.
With ¾’ automotive masking tape, I carefully covered the edges of the window opening adjacent to the interior panels. Then I used pre-taped masking plastic to seal the window opening completely. Next, I used masking tape to create a boundary around the outside of the window tracks. In the blend areas, I made sure this boundary was just beyond where I would want the primer strip to stop.

Then I used foam tape on that masking tape edge to create a “soft” blend line when the primer was sprayed. A soft blend line is much easier to sand smooth than a hard tape line in preparation for the next paint layer.
Next, I used more of the pre-taped plastic sheeting, as well as drop-cloths, to cover the remainder of the BMW.

10. Prime Using a high-quality primer, I carefully coated the tracks with multiple thin layers of primer, allowing the primer to dry several minutes between coats. The later few coats were put on a bit heavier to create build, and these were allowed to dry for 30 minutes each.
Once the primer was completely sprayed, I allowed it to cure for 24 hours. I wanted to make sure it was fully dried all the way through.
11. Sand and Clean Next, I removed the masking tape that served as a blend line on the existing paint. I used 600-grit sandpaper—wet—to smooth the dried primer surface. This also “opens up” the primer surface to allow the color coat that follows to etch into and “grab” onto the primer for adherence.
During this step, the edge of the primer that meets up with existing paint must be smoothed so that it doesn’t show through as a terrace under the color coat.
After all the sanding is done, the area is again wiped clean, but this time using a water-based wax and grease remover. It is critical to use water-based instead of sol vent-based cleaner on the freshly sanded primer, otherwise the solvent will absorb into the primer, causing adhesion problems for the color coat to follow.
12. Mask for Color and Basecoat Most of the masking to seal the window openings was intact, so I didn’t have to redo that.(Although I kind of wish I had taken the time to remove it because the dried primer on the plastic sheeting did flake off somewhat.Fortunately, none of it flaked off during the subsequent spraying.}
Remember, however, that I had removed the masking tape used to protect from primer overspray on the intact painted surface.Also, I didn’t want color and clearcoat to be allowed to migrate willy-nilly all over the roof.It would take a lot of work to remove that overspray.So, I created a masking boundary about two inches from the final clearcoat blending area and again used a “soft” masking technique.
13. Spray Basecoat It’s finally time to shed some color on the situation!Using the paint code from the vehicle, I had my local Sherwin-Williams Automotive branch mix up a pint of basecoat in their Sunfire brand.The paint code on most BMWs is under the hood on a decal near the strut housing.
Using a spot-blending HVLP spray gun, I slowly coated the primed area in color.Several thin misting coats are always better than thick coats, so it takes a number of passes to get the primer completely covered. After that, I like to hit it with one or two medium coats just to make sure it’s fully covered, with no primer showing through.The basecoat is then allowed to fully cure for at least 24 hours.
14. Spray Clearcoat After checking tape lines for any holes, I used a tack cloth to wipe away any dust from the painted area. Then I mixed up the clearcoat (Speedokote Euro Clear Low 2.1 VOC 2K Urethane) and sprayed it on with the same spot-blending HVLP gun. The key is to maintain a hard blend line somewhere between the edge of the basecoat layer and the tape line in order to maintain an area that can be blended.
By the time I made it all the way around the areas to be sprayed, the clear had set long enough to apply a second coat.
15. Spray Blend Coat I mixed up some leftover clear 1:1 with blending solvent and misted the hard clearcoat edge until the new clear side and existing paint side matched in shininess.
16. Remove Masking I allowed the painted area to sit overnight, then removed all of the masking and drop cloths.The painted tracks looked fantastic. Auto Glass Specialists suggested allowing the paint to cure for 2-3 days before reinstalling the glass. Since the painting was completed on a Thursday, I made an appointment for the glass to be reinstalled on Monday morning.